How To Set Up Studio Monitors
When setting up a home studio, you will have to absorb a ton of information and learn about all sorts of audio equipment.
So what is the most important thing you need when producing music? No, not music theory knowledge. Nope, not a fancy mixing board…
What you really need is to hear an accurate representation of your sound. Studio monitors are different from speakers because instead of trying to produce a loud sound that will travel as far as possible, studio monitors produce an accurate sound that will travel a shorter distance.
If you haven’t found a good pair of studio monitors yet, I made a list of the best studio monitors. I highly recommend checking it out to get a better idea of what studio monitors are out there.
In this article, we will be talking about how to set up studio monitors. It isn’t too complicated of a process. The most confusing part about setting up monitors is not knowing what to plug in where.
Still Searching for Studio Monitors?
If so, make sure to check out our list of the Top 10 Studio Monitors. It’s the ultimate guide for anyone new to music production!
What Is Needed
- A pair of studio monitors
- an audio interface
- 2 XLR to 1/4 inch cables (You can also use RCA if your monitors don’t support XLR)
Are your monitors active or passive?
Before we start, you should find out if your monitors are active or passive.
Active monitors require power. They have built-in amplifiers and are a more affordable option.
Passive studio monitors tend to be lighter because they don’t have a built-in amplifier. You will need a separate amplifier to use passive monitors.
I will be going over how to setup active studio monitors. The only difference between setting up active monitors from setting up passive monitors is that you have to worry about an external amplifier when using passive monitors.
The Basic Setup
- Step 1) – Connect the power cables to both of your monitors
- Step 2) – Connect the power cable to your audio interface.
- Step 3) – Connect the XLR cables(or RCA) to your monitors.
- Step 4) – Connect the other side each cable to your audio interface. Right now don’t worry about which input is right and which input is left. We will be running a test on that later.
- Step 5) – Connect the USB cable from your audio interface into your computer.
Note:
Make sure you turn your studio monitors on. There should be a switch to turn on each individual monitor.
Configuring Your Interface On Your Computer
Typically you’d want to change your output within your DAW.
You can also just change your sound output device on your computer.
On a Mac you would go into System Preferences>>Sound…
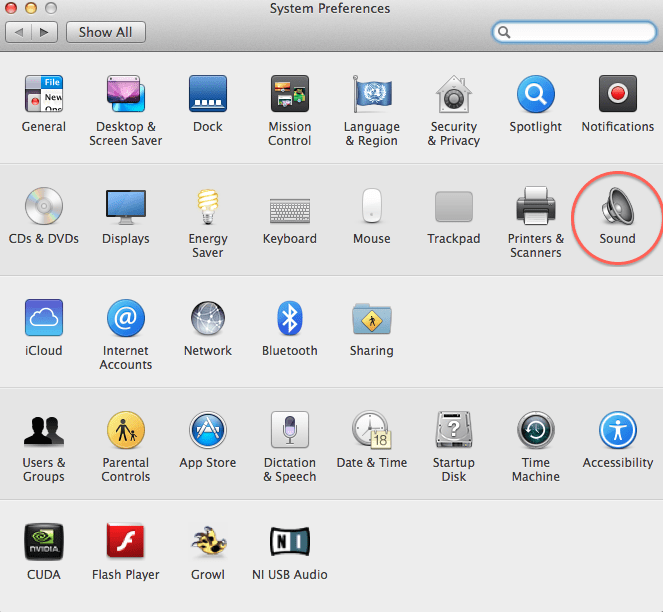
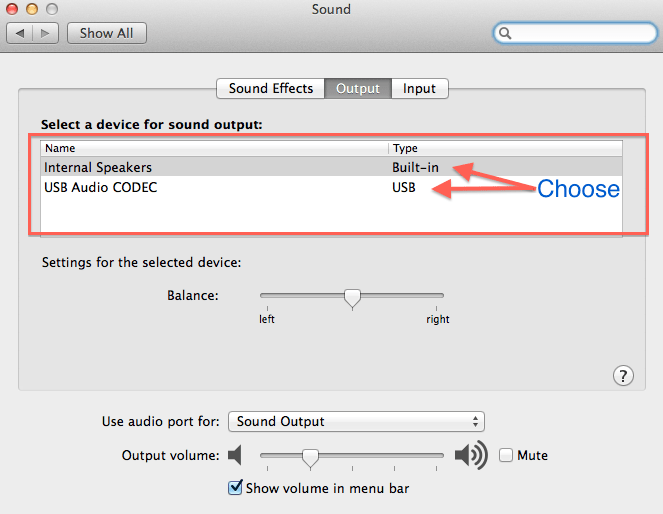
…And now you can choose your audio output device.
Note:
If you don’t hear any sound after changing your output device, make sure the gain is turned up on your interface.
Testing
Here is a speaker test that will help you identify the right and left channels on your interface. If your channels are wrong, simply reverse the two inputs connected to your interface.
Thank you for reading our article on setting up studio monitors!
I hope I have helped you with your biggest concerns on setting up studio monitors. If I missed anything, feel free to drop a comment down below.
Looking for a killer pair of studio monitors. View our studio monitor recommendations here. Enjoy!
Leave a Comment